
Beyond the Gift Card: DIY Checkered Maximalist Teacher Appreciation Corkboard
Hello, my fellow DIY-obsessed lovers! Today is going to be a fun one and if you are new here, welcome to my world of everything is EXTRA. Now, if you’ve been around for a while, you know the drill: we don’t do “boring,” we don’t do “beige,” and we certainly don’t just hand over a gift card in a plain paper envelope. (VIDEO TUTORIAL AT THE BOTTOM)
As we approach Teacher Appreciation Week, I found myself staring at a stack of gift cards and thinking, “How can I make this feel like me?” The answer is always paint, patterns, and a little bit of thrifted magic.
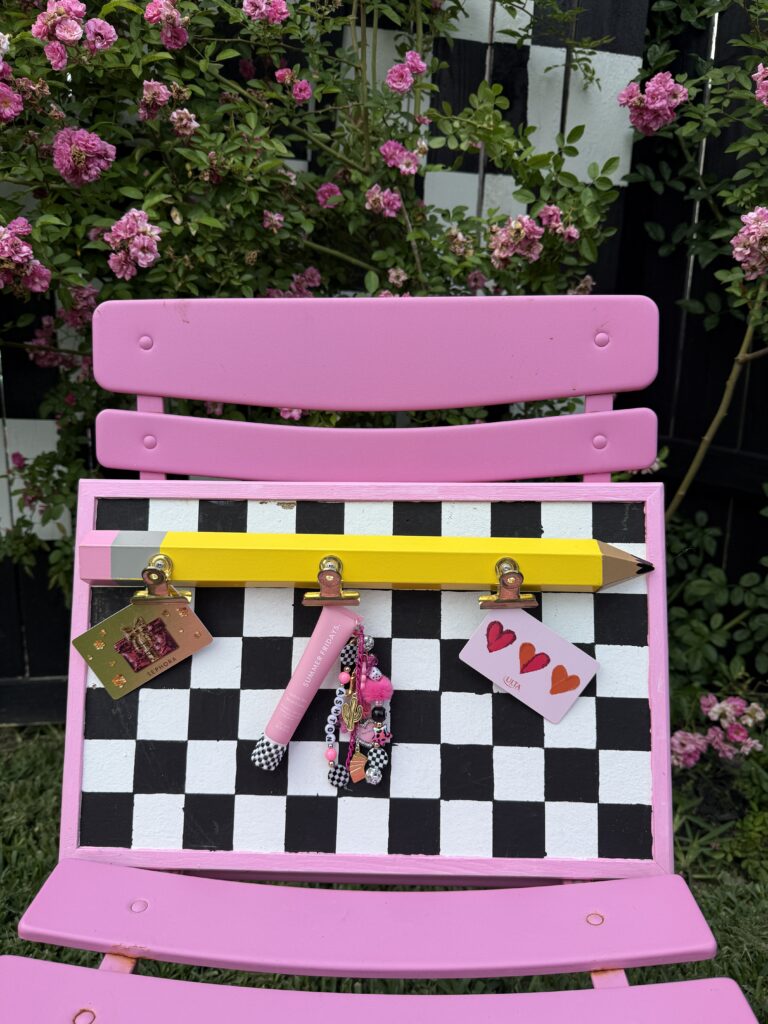
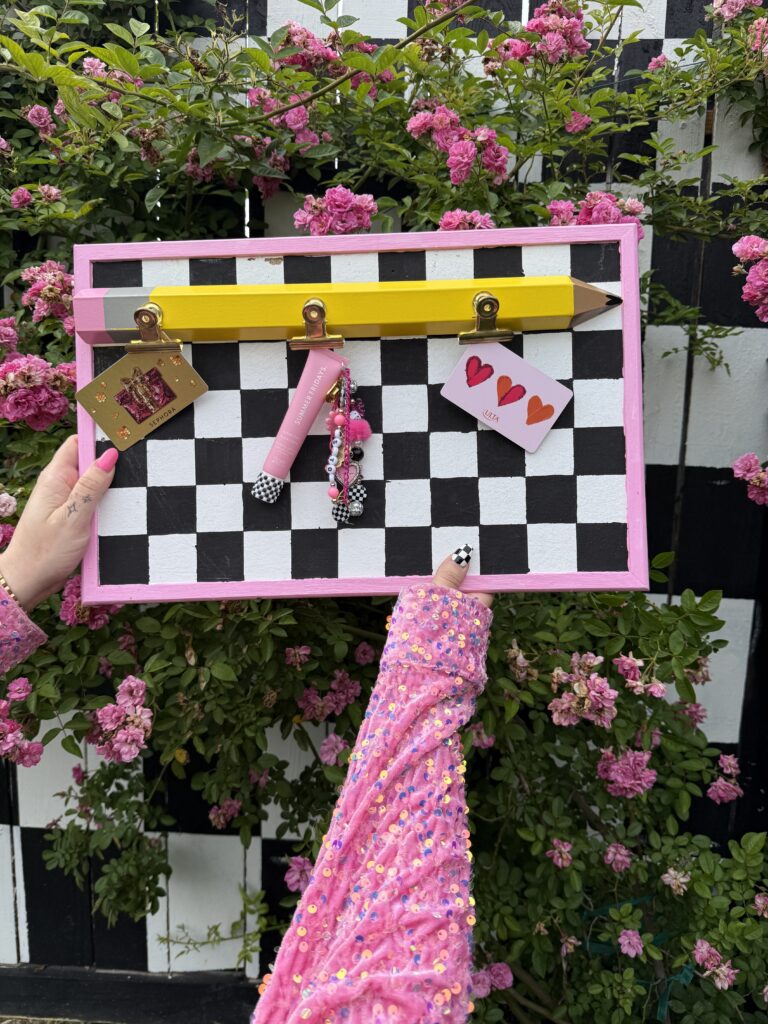
Today, I’m walking you through the full step-by-step tutorial for this Checkered Pencil Corkboard. It’s functional, it’s bold, and it screams “best student (parent) ever.”
When is Teacher Appreciation Week?
Before we dive into the paint fumes, let’s talk timing. Teacher Appreciation Week generally falls during the first full week of May, with National Teacher Day landing on the Tuesday of that week. However, this project is totally evergreen! Whether you are looking for an end-of-the-year “thank you,” a back-to-school “hello,” or a mid-winter “hang in there,” this DIY is the perfect way to show gratitude.
The Maximalist Philosophy: Why a DIY?
You know me…I can’t just give a gift card. Everything has to have that EXTRA energy. Why? Because our teachers work tirelessly to pour into our kids, and I believe our gifts should reflect that same level of energy and intentionality. A gift card is great (and let’s be honest, teachers want them), but the delivery is where you can let your creativity shine.
The Supply List: Everything You Need
To make your life easier, I’ve rounded up the exact items I used (and a few favorites) so you can add them to your cart and get crafting.
The Foundation: Corkboards
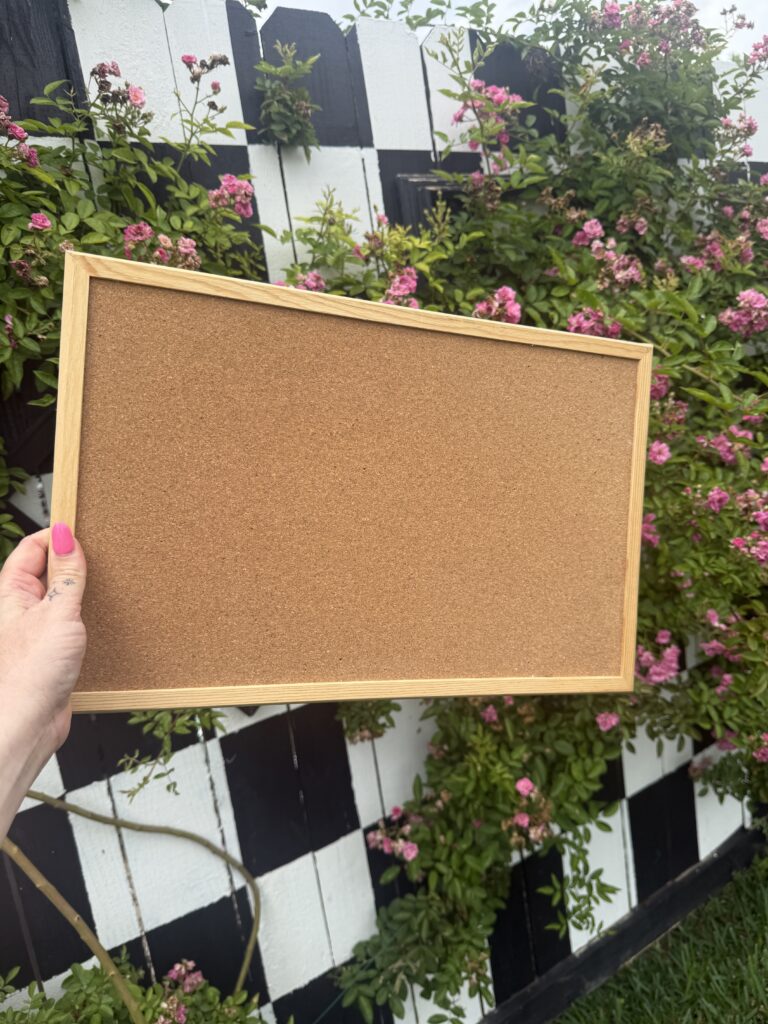
Depending on how many gift cards or “extras” you want to pin, you might want to go big or keep it desk-sized.
- [Large Corkboard (24×36)] – Perfect for a teacher to use in their classroom for years to come.
- [Small/Medium Corkboard (11×14)] – This is the size I used! It’s great for a personal desk “mood board.
The Paint & Primer (The Crucial Step!)
To get that vibrant maximalist finish, you can’t just slap paint onto a raw corkboard. It will soak it up like a sponge! You must prime first.
- [Spray Paint Primer (White)] – I used a basic flat white spray primer to seal the cork and provide a perfect base.
- [Light Pink Chalk Paint] – For that signature pop of color on the frame.
- [White Chalk Paint] – Your base for the first coat of the checkers.
- [Black Chalk Paint] – For the bold checkered contrast.
- [Craft Paint Brush Set] – A mix of flat head brushes for the frame and detail brushes for filling in the grid.
The Precision Tools
- [1.41″ Painter’s Tape] – This is essential for your initial alignment and grid-laying.
- [Standard Number 2 Pencil] – For sketching the free-hand grid!
The “Extras” & Gift Ideas
- [Summer Fridays Lip Butter Balm] – A total luxury splurge.
- [Amazon Gift Card Multi-Pack]
- [Starbucks Gift Card]
- [Visa Gift Card]
- [Sephora Gift Card]
- [Ulta Gift Card]
Step-by-Step Tutorial: The Perfect Checkered Board
Painting checkers on cork can be tricky, but using the base primer and the pencil method makes it foolproof!
Step 1: Prime and Base Coat
First, take your board to a well-ventilated area and give the entire cork surface a thorough coat of Spray Paint Primer. This seals the porous surface, making it much easier for your paint to sit on top without sinking in. Let that primer dry completely. Next, apply your first base coat of White Chalk Paint and let that dry. You always want to start with the lightest color you are using as the base coat.

Step 2: Taping the Initial Grid
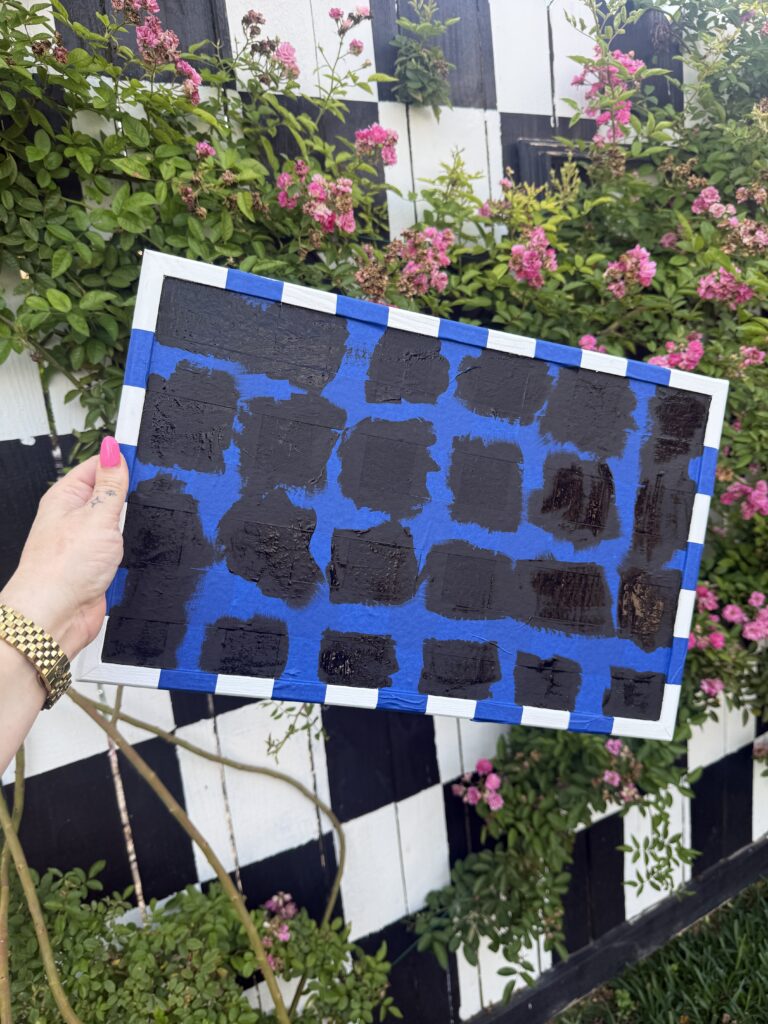
Now, let’s get precise. Use your 1.41″ painter’s tape to lay a grid across the board. The goal here isn’t to tape off every other square; it’s to create an even, repeating grid pattern that will serve as your guide. (Now, I’m going to be honest, you could just measure but I work smarter not harder and I thought it would be easier to use the paint as the guid for spacing).
Step 3: Paint the Open holes!
Once you make sure you have firmly pressed the tape down paint the open holes your desired color. For me it was BLACK. (I wanted a classic checkered look). The firmer the tape is… it is less likely to have anything bleed into the parts you don’t want painted.
Step 4: Next set of squares!
Once the paint is dry, remove the tape. Here is where you have options. You have to create the remainder checkers and you have 2 options. #1. Either Re-tape, NOW IN THE NEW PLACES that need paint. OR OPTION #2- My personal favorite…Go through the board with your pencil and lightly trace lines to finish off the squares.
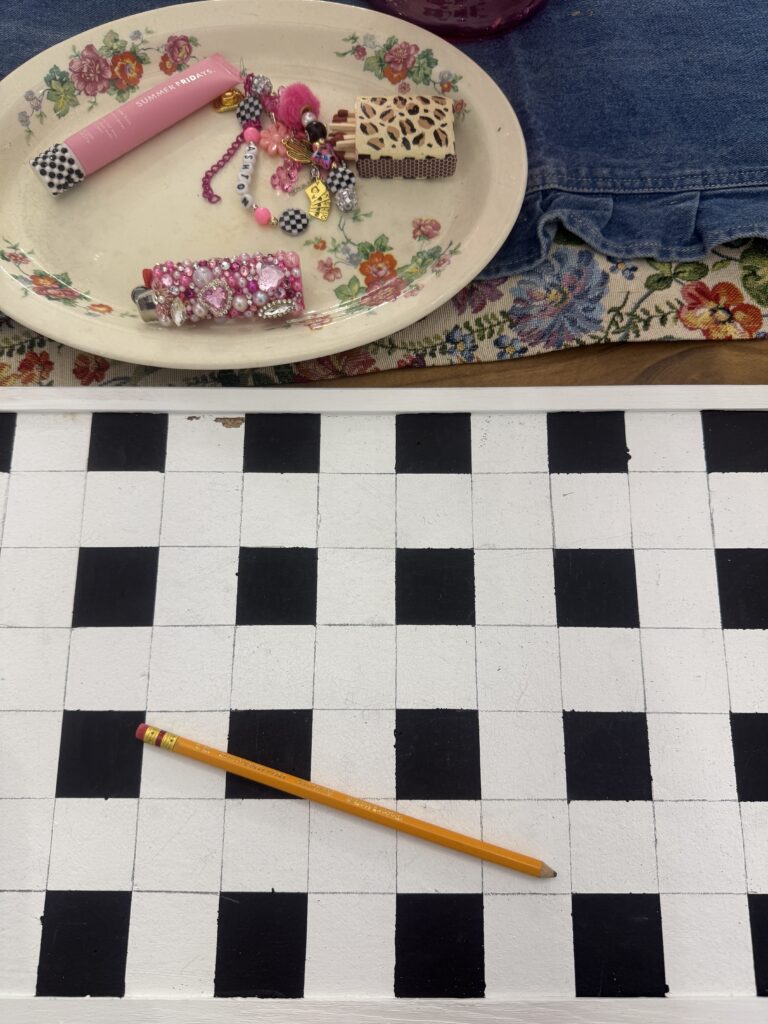
Step 5: Filling in the Black (Free-Hand!)
Grab your black chalk paint and a small detail brush. Using your pencil lines as a guide, carefully free-hand paint in every other square. This takes a steady hand, but it’s so satisfying! You get that authentic “Ashton Sedita” look that screams handmade quality.
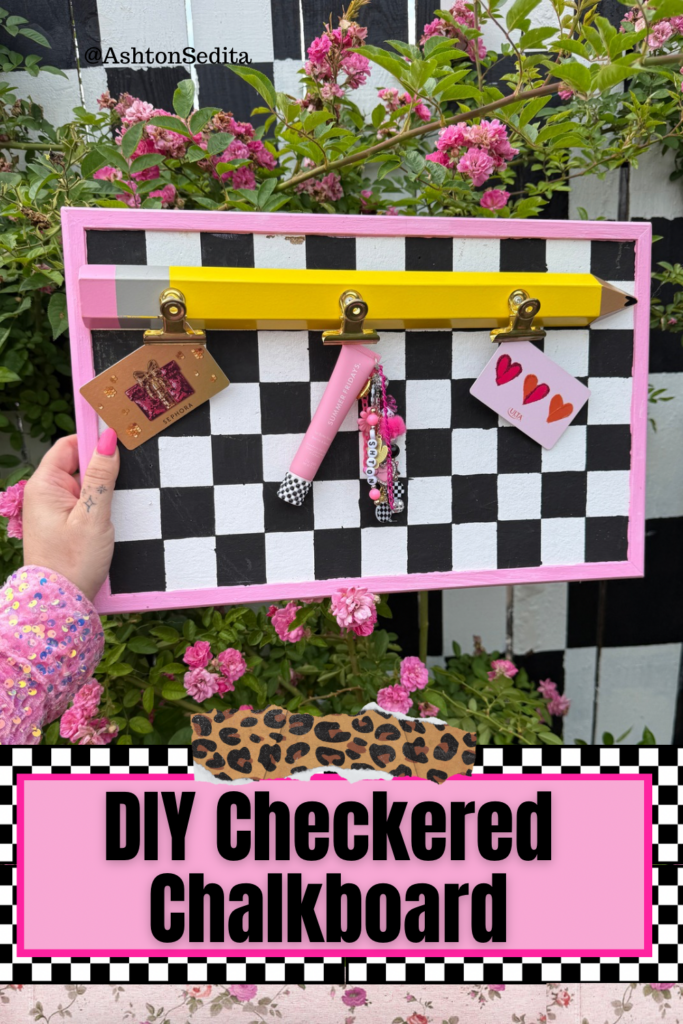
Step 5: The Reveal and Final Touches
Give the border a few coats of your desired paint color until it’s perfectly and punchy.
Level Up Your Gift: The Details
The Summer Fridays Lip Charm
You see that cute little charm hanging off the lip balm in my photo? I have a whole separate blog post on [How to Create Your Own Custom Lip Balm Charms].
The “Teacher’s Favorite Things” Printable
Every new school year, I have all my son’s teachers fill out this form. It asks the teachers all their favorites: their go-to coffee order, their favorite snack, and even their “treat yourself” spots. You can grab the [Free Teacher’s Favorite Things Printable here]. It makes gift giving for the teachers so easy, because you know exactly what they love.
Join the Community
Festively Booked Book Club
We are all about romance, community, and celebrating the “festive” side of life. [Join the Festively Booked Facebook Group here].
Never Miss a Project
- Subscribe to the Newsletter: [Sign Up Here]
- Follow me on Socials: TikTok: [@ashtonsedita]
- Instagram: [@ashtonsedita]
- Facebook: [Ashton Sedita Author]
Why “The Extra Effort” Matters
Giving a gift that is handmade and bursting with color tells the recipient that they are worth the effort. Teachers are the backbone of our community, and if anyone deserves a little extra “maximalist energy,” it’s them!
Happy Crafting! If you try to make your own checkered board… , make sure you tag me on socials….nothing makes my day more than seeing your takes on my projects and I would loved to share!!
xoxo
Ashton Sedita
![[Sign Up Here]](https://ashtonsedita.com/wp-content/uploads/2019/12/newsletter-wdgt-bg.png)