How to Create a Retro-Inspired Halloween Front Yard: DIY Decor Tips

As someone who loves getting creative with festive décor, Halloween is one of my absolute favorite times of the year! This year, my front yard has undergone a spooky, retro-inspired transformation, and I couldn’t be more excited to share the details with you. From glowing pumpkin pails to skeletal guards and my DIY fence project from last year, my yard has a nostalgic 1950s-1990s vibe that’ll take you back to the golden era of Halloween decor.
RANDOM- but if you are an OG-ER you know our subdivision does a Halloween front yard decorating contest and we have never won- every year I love taking y’all along as we decorate and transform our front yard- I will say this year is MY FAVORITE. And I truly cannot wait to see if we place, what do you think- what place should we get- 1st, 2nd or 3rd- or NOT AT ALL?
In this post, I’ll walk you through each piece, give you tips on finding or recreating retro Halloween décor, and share DIY projects that you can tackle on your own. If you’ve been searching for inspiration to give your yard a classic, retro makeover, you’re in the right place!
*(Disclaimer: This post may contain affiliate links. If you purchase something through these links, I may earn a small commission at no extra cost to you. This helps me continue creating fun, festive content just like this!)*
????Why Retro-Inspired Halloween Decor?????
There’s something magical about the simplicity and charm of vintage Halloween décor. When I was a child, Halloween felt like a magical time filled with orange-and-black color schemes, cheerful (but slightly spooky) Jack-o’-lanterns, and kitschy plastic figures glowing in front yards.
As I began planning this year’s yard display, I knew I wanted to capture that same nostalgic feeling—where spooky meets fun. My love for retro Halloween stems from the classic aesthetic of the mid-century era, where bold colors, glowing plastic decorations, and playful skeletons ruled the spooky season.
Key Elements in My Retro Halloween Yard Display
Let’s dive into the specific features of my yard, with some DIY projects thrown in for good measure!
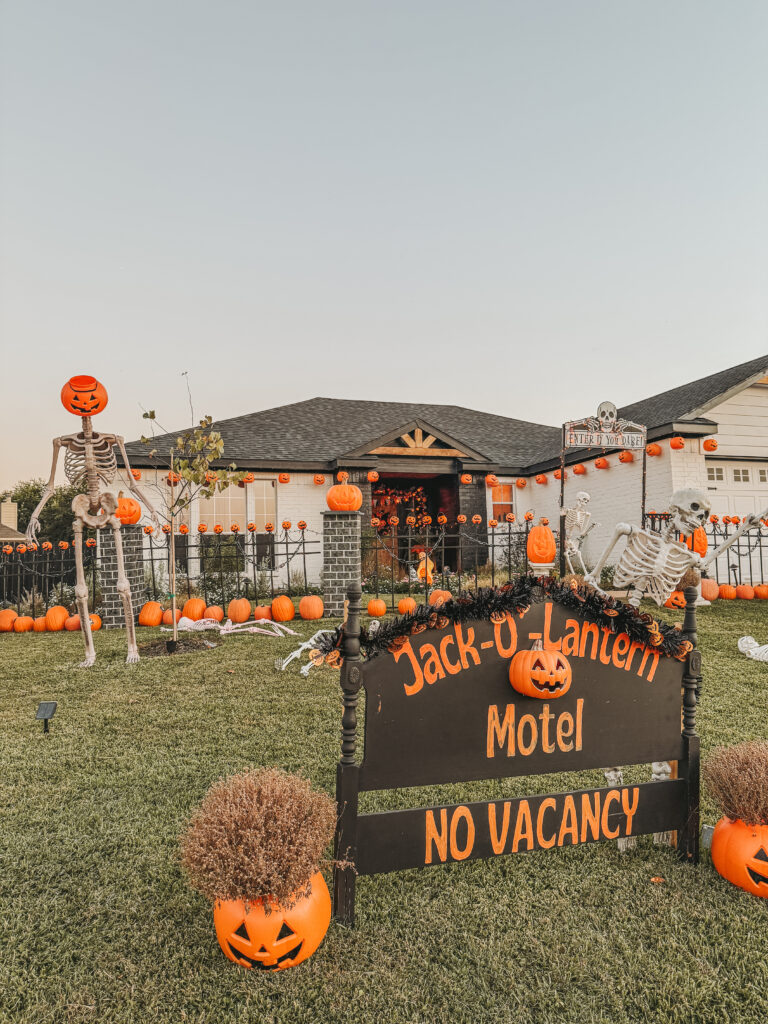
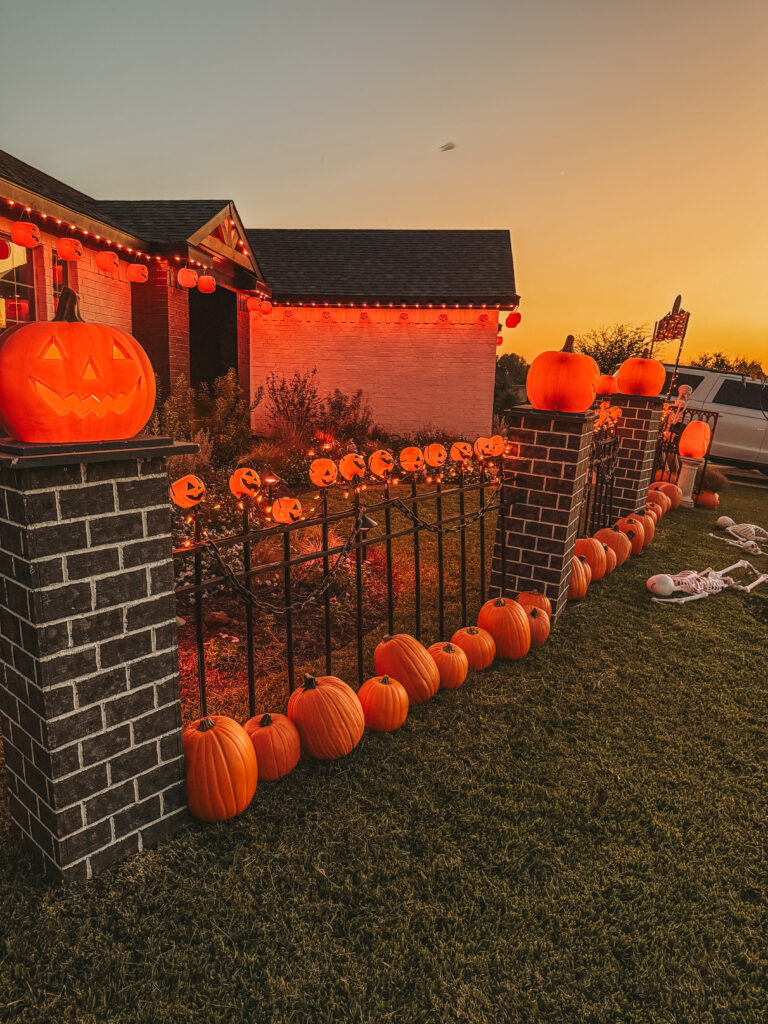
1. **DIY Halloween Fence (A Project From Last Year)** (VIDEO TUTORIAL BELOW)
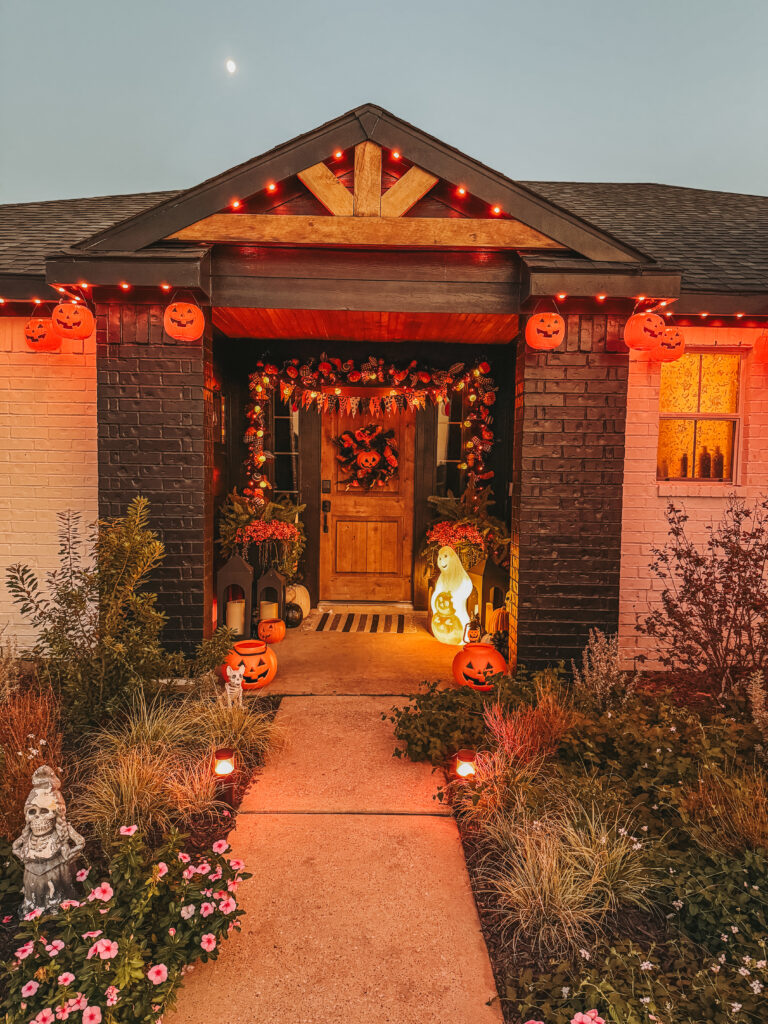
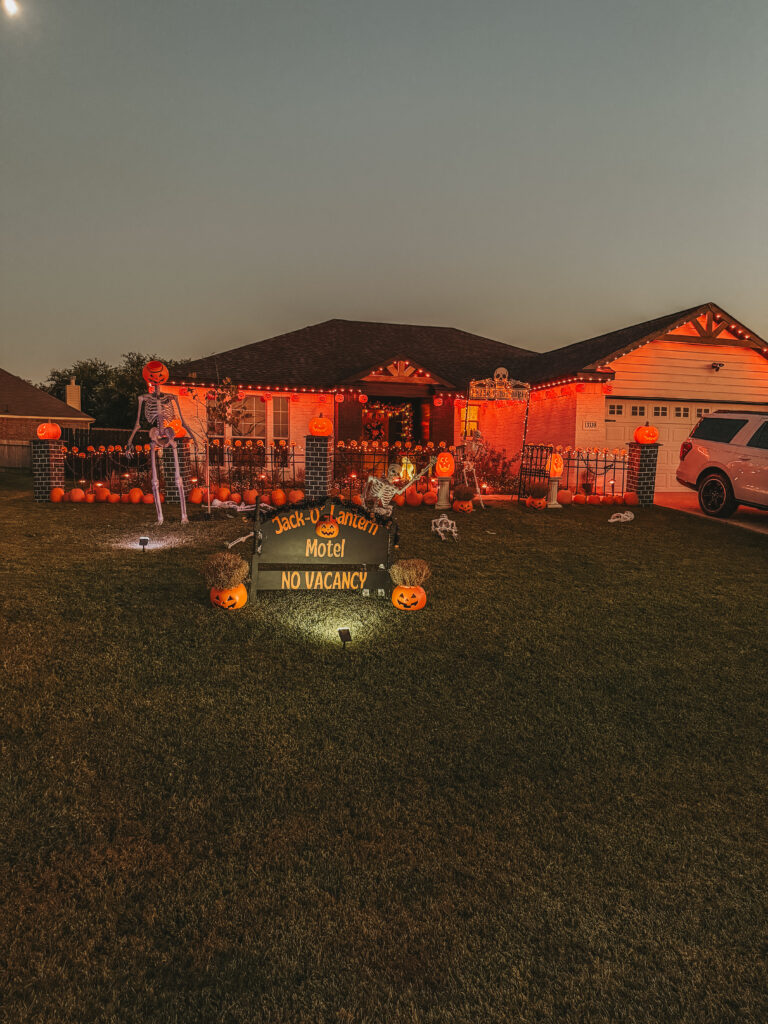
The DIY fence you see framing my yard is one of my proudest accomplishments. This fence wasn’t just bought off the shelves—oh no. Last year, Chris and I created this decorative masterpiece using some affordable supplies and a whole lot of creative energy. The skeletons and pumpkin pails that sit along the top were all part of a simple yet effective DIY process.
Here’s a quick breakdown:
– **Supplies:** I used our DIY Faux Rod Iron Fence but (you can find similar ones online). I added a string of lights across the fence and added mini vintage-inspired pumpkin pails by drilling small holes in the bottom and putting them right on top of the fence posts and shoving 2 of the lights in the pumpkins to have the pumpkins glow orange.
-**Pumpkin Posts:** I added these battery powered pumpkins to each of the posts as like a top and I LOVE the dramatic look. Also something fun- these pumpkins have a timer on them built in- so it has an on, off and timer switch. THE TIMER is perfect so you don’t have to go outside everyday and turn them on. I also love that they are battery operated so ON LESS PLUG!
– **Skeletons:** I love skeletons that give off that eerie, classic Halloween vibe. They flank the entrance to my yard, creating an old-school haunted house feel. I feel like you can never go wrong with skellys.
– **Painting:** For the fence, I added a matte black coat to enhance the retro feel, giving it that slightly aged, vintage look.
This project adds the perfect border to my yard and ties together the various spooky elements, like the skeleton guards and the pumpkin pails, with that classic glow.
2. **Glowing Pumpkin Pails and Retro Lighting**
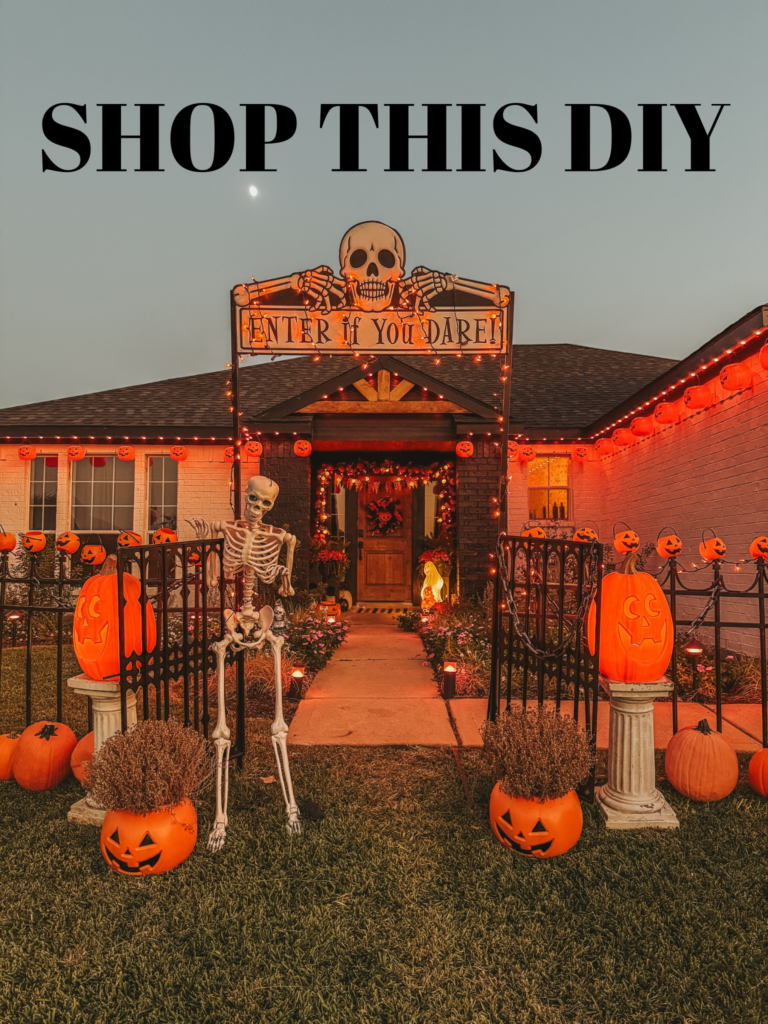
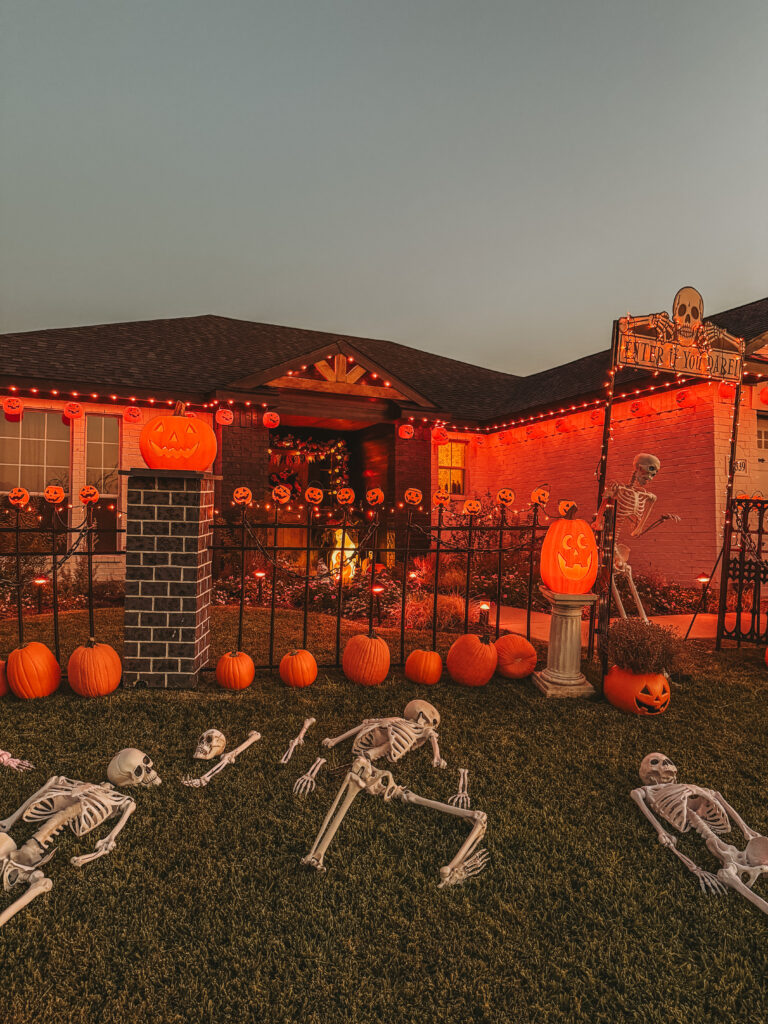
You’ve probably already noticed the glowing orange pumpkins hanging around my house. These are such an iconic piece of retro Halloween decor, reminding me of the plastic pumpkin buckets kids used to carry for trick-or-treating. I’ve turned them into hanging decorations that surround the roofline of my house, creating a glowing orange perimeter. This was so easy- we just used [these command] hooks and put the along our roofline and hung the pumpkin pales from them.
The key to making these pumpkins really shine is proper lighting. JELLY FISH LIGHTING FOR THE WIN! Last year we had Jelly Fish install some of the their permeant lighting [blog post here] and this year we added a few additions- we added the landscaping lights (which you can see the orange glow near the flowerbeds) and on our pergula in the back.
If you want to have the WOW factor for your yard decor- lighting is such an important aspect especially of vintage Halloween decor, and these glowing orange pails add a playful yet eerie ambiance to my yard. I love how the pumpkins’ faces cast shadows and give off that warm, nostalgic glow.
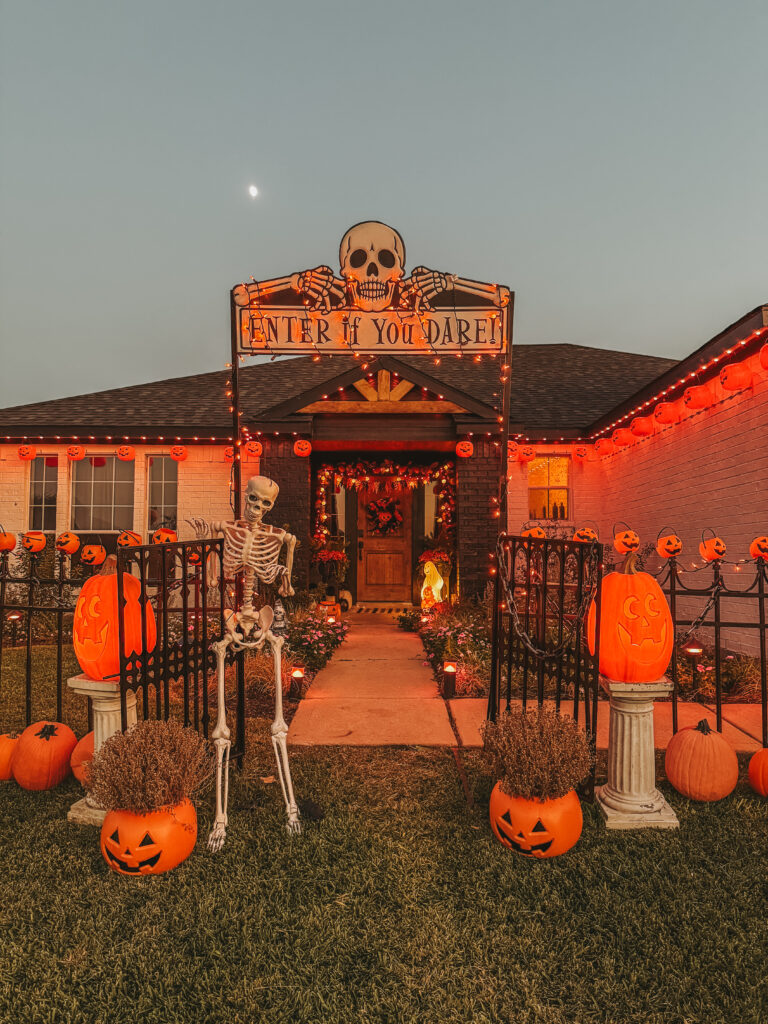
3. **Skeleton Guards and Gate Entrance**
What’s a retro Halloween yard without skeletons guarding the entrance? My skeletons stand proudly at the front of my yard, giving off that spooky yet whimsical vibe that I adore. Each one is posed to “guard” the front entrance, giving a friendly but eerie welcome to all trick-or-treaters.
Above the gate, you’ll notice my “Enter If You Dare!” sign, which completes the look. The sign is a playful nod to haunted houses and trick-or-treat mazes of the past. It has that perfect mix of spooky and kitsch, which ties right into the overall retro aesthetic. I actually bought this last year at home goods of only $199 and I felt like it was the perfect addition to our DIY fence.
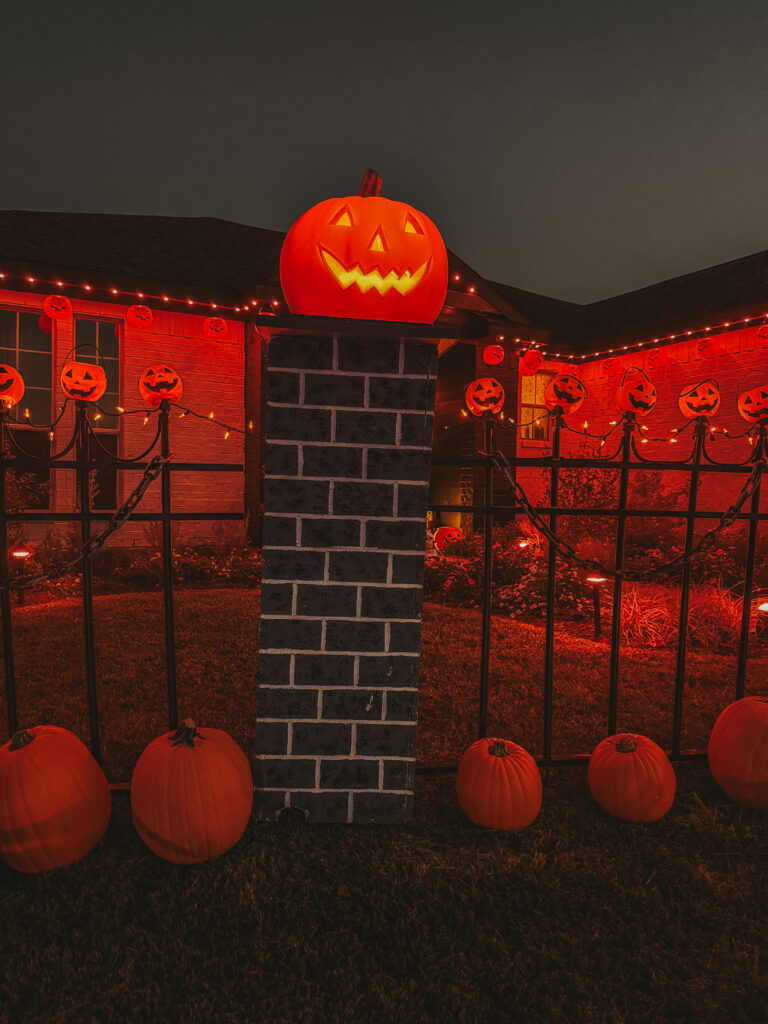
4. **Jack-o’-Lantern Pedestal**
At the center of my display sits a vintage-inspired Jack-o’-lantern perched atop a pedestal. Its bright, smiling face is a callback to the cheerful pumpkins of the 1950s. I found this piece at an estate sale while Chris and I were road tripping near Tyler, Tx and they were only $10/EACH and knew I had to incorporate it into my yard. The chippiness is everything and immediately new I had to have them for Halloween.
I love that the pumpkin is both spooky and welcoming, with its classic features and playful grin. It’s one of the key pieces that draws attention from the street and makes my yard feel like a time capsule of Halloween’s golden era. Also something fun- these pumpkins have a timer on them built in- so it has an on, off and timer switch. THE TIMER is perfect so you don’t have to go outside everyday and turn them on. I also love that they are battery operated so ON LESS PLUG!
5. **Pumpkins, Pumpkins, and More Pumpkins!**
Nothing says classic Halloween like a sea of pumpkins! I’ve lined my yard with various faux pumpkins I’ve been collecting over the years. I’ve scattered them along the fence and entrance to bring out that traditional autumn vibe. The mixture of textures and sizes really adds dimension to the display.
One thing I love about pumpkins is their versatility. Whether real or artificial, you can customize them to fit any theme, but for a retro look, I keep them simple and traditional—classic orange and round. The symmetry of the pumpkins along the entrance path is something straight out of a vintage Halloween postcard.
6. **YARD SIGN**
I was inspired on this one. I saw a picture on FB this summer- someone had turned a thrifted head board into a sign for Halloween for their front yard. I stubbled across this head board over the summer for $30 at a local antique store, and originally I wanted to use it as a sign for my antique booth but the closer it got to Halloween, I couldnt’ stop thinking about it being a sign for our front yard for Halloween. I feel like the sign just ties the whole space together.
How to Get the Retro Look: Finding Authentic and Affordable Decor
If you’re looking to recreate a retro Halloween yard like mine, the key is in finding authentic pieces or retro-inspired alternatives. Here are my top tips for sourcing items:
1. **Thrift Stores and Antique Shops**
Thrift stores are my go-to for finding authentic vintage Halloween decor. If you’re lucky, you might find old blow molds, skeletons, or even plastic pumpkin pails from the 1970s or 80s. The thrill of the hunt is half the fun! Make sure to check out estate sales too—they can often be treasure troves for retro décor.
2. **Online Marketplaces**
Sites like eBay or Etsy are perfect for finding authentic vintage items or even newer retro-inspired pieces. Be sure to search for specific keywords like “vintage Halloween blow mold,” “retro Halloween decor,” or “vintage Jack-o’-lantern lights.” Don’t be afraid to haggle for the best price, especially if you’re buying multiple items. Y’all know my love for ETSY- every year I love to do a Halloween gallery wall and I use prints from Etsy. Here is this years Halloween gallery wall.
3. **DIY Retro-Inspired Projects**
Can’t find what you’re looking for? Make it! Many of the elements in my yard, like the pumpkin pail lights and DIY fence, are completely homemade. With a little creativity and patience, you can recreate the retro look without breaking the bank. I have always wanted a rod iron fence or Halloween but refused to spent the money- SO DIY for the win.
I also recommend repurposing everyday items. For instance, old holiday lights can be spray-painted orange and used for Halloween, or you can create your own spooky signage with cardboard and paint.
How to Make Your Own Retro DIY Halloween Fence
Since my DIY Halloween fence is a big part of this year’s decor, I wanted to walk you through the steps for creating one of your own:
Materials Needed:
– PVC pipe
-1×2 boards
– Mini Plastic pumpkin pails
– Black spray paint
– Foam WINDOW SEAL Tape that will be the swoop for the fence
Step-by-Step Instructions:
1. Figure out your spacing for your fencing(WE DID 18″) APART BETWEEN EACH PVC PIECE- then you will need a drill a whole with 1/2″ spade bit and slide the 1/2″ PVC in fence. Drill a screw into the wood into the PVC to make sure it stays in place
2. Add the foam tape to create the swoops on the fence
3. Add the toppers to the pvc to create a realalistic fence
4. Spray paint the whole “DIY Fence”
5. **Attach Pumpkin Pails:** Drill small holes in the bottom of the pumpkin pails and secure them along the top of the fence pickets
3. **Add Lighting:** lights through the pumpkin pails to make them glow at night. You can also run lights along the fence for an extra spooky touch.
4. **Add Skeletons (Optional):** Secure skeleton figures at key points along the fence for a playful, haunted look.
This fence is easy to customize and adds that perfect pop of retro charm to any yard!

Creating a Spooky, Yet Fun Atmosphere
The balance between spooky and fun is the secret sauce to achieving a retro Halloween look. While the skeletons, Jack-o’-lanterns, and orange glow create an eerie vibe, there’s also a sense of playful nostalgia that makes my yard approachable and festive.
I’ve received so many compliments from neighbors and trick-or-treaters who love how my yard stands out as both spooky and inviting. Retro decor has a way of evoking fond memories of Halloween past, which makes it fun for adults and kids alike.
There you have it—my retro-inspired Halloween yard décor in all its spooky glory! Whether you’re a fan of nostalgic Halloween or just love DIY projects, I hope this post has inspired you to bring a little vintage charm to your own yard.
If you recreate any of these looks, be sure to tag me in your creations on social media! I’d love to see how you add your own spin to retro Halloween decor. Follow me on all my platforms for more fun, festive ideas: @AshtonSedita.
**XOXO Ashton**