The Ultimate DIY #2 Pencil Gumball Jar: Because Teachers Need More Than Just Apples
Let’s be real for a second. May is basically the December of the spring semester. It is absolute, unadulterated chaos. You’re dragging yourself to the finish line of the school year, trying to remember what day it is, and suddenly you realize: Oh my gosh, Teacher Appreciation Week is here. For those of you who block this out every year until the last minute, let me save you a frantic Google search. Teacher Appreciation Week always falls on the first full week of May, kicking off on that first Monday. Write it down. Put it in your phone. Set an alarm. Because if there is one group of people on this planet who deserve to be celebrated, showered with gifts, and generally treated like royalty, it’s teachers.
Let’s pause and reflect on why teacher appreciation is so important. These incredible human beings spend their days wrangling, educating, and somehow not losing their minds over our children. Now that my youngest is navigating the wild world of junior high (and bringing all that junior high mascot energy with him), I am more acutely aware than ever that teachers are absolute absolute rockstars that deserve VIP treatment all year round. They do the heavy lifting so we don’t have to do long division. They deserve the world. But since I can’t afford to buy them private islands, I’m giving them the next best thing: a ridiculously cute, slightly maximalist DIY craft stuffed with high-end, trendy goodies.
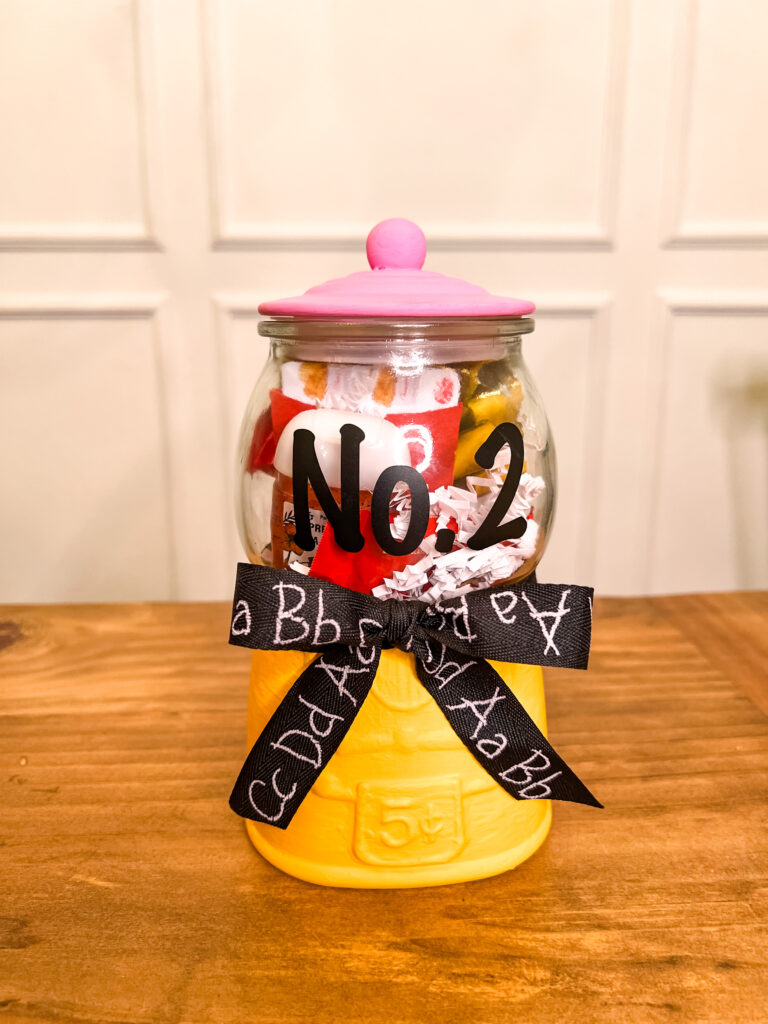
Today, we are turning a simple glass gumball jar into an adorable, eccentric #2 pencil, and we are filling it with things your teacher actually wants.
The Secret Weapon: The “Meet the Teacher” Hack
Before we get into the paint and ribbon of it all, I have to share my ultimate teacher gift hack. One of my absolute favorite things to do at the beginning of the year is to figure out exactly what my kid’s teachers actually like.
When you go to Meet the Teacher night, do yourself a favor and have them fill out a “Teacher Favorites” card. I have a Printable Teacher Favorites PDF right here on the blog. Print it, hand it over, and keep it in your files. That way, when May rolls around, you aren’t guessing if Mrs. Smith prefers Starbucks or a local coffee shop, or if she’s allergic to the very chocolate you were about to buy her. You can fill this adorable gumball jar with exactly what she loves.
But, if you forgot to do that this year, don’t panic. I’ve got a foolproof list of trendy fillers below that will make any teacher swoon.
The Project: The #2 Pencil Gumball Jar
I found this cute little gumball machine jar and instantly knew it needed a makeover. A plain glass jar? Not in this house. We are going to paint it, Cricut it, and ribbon it until it looks like a giant, nostalgic #2 pencil. It’s functional, it’s decorative, and it’s a massive step up from a standard gift bag.
Here is everything you need to recreate this masterpiece. And yes, I’m linking everything to Amazon because, let’s be honest, nobody has time to go to four different craft stores in the middle of May. Prime it to your porch, ladies.
The Supply List (Amazon Links Below!)
- The Glass Gumball Jar: The star of the show. Sometimes you can find these online or at your local craft store, but here is a similiar one.
- FolkArt Matte Acrylic Paint: We need that perfect school bus yellow and the classic eraser pink. I used FolkArt Matte in School Bus Yellow and FolkArt Matte in Baby Pink. This paint goes on so smoothly. [Grab the yellow here] and [grab the pink here].
- A Cricut Machine: If you don’t have a Cricut yet, what are you even doing? I use my Cricut for everything. It is how we are going to get that flawless “No. 2” on the glass. I highly recommend the Cricut Maker. It is a workhorse. [Link to my favorite Cricut Maker here].
- Permanent Black Vinyl: For your Cricut cuts. [Standard black vinyl works perfectly].
- Teacher-Themed ABC Ribbon: To tie it all together and hide the transition line between the “pencil” and the glass.Look for something black and white with letters to make the yellow pop. [This ABC ribbon is adorable].
- Paint Brushes & Painter’s Tape: The essentials.
The “Trendy & Extra” Fillers
Now, what goes inside the jar is just as important as the outside. We are skipping the cheap plastic trinkets. We want things that say, “I see you, I appreciate you, please continue to tolerate my child.”
- Summer Fridays Lip Butter Balm: Listen, this is the IT lip balm right now. It’s luxurious, it smells amazing, and teachers talk all day—they need hydrated lips.
- Touchland Power Mist Hand Sanitizer: Hand sanitizer, but make it aesthetic. These flat, colorful little sprays are incredibly trendy, smell fantastic, and fit perfectly in a pocket or desk drawer. Plus, schools are germ factories.
- Other Ideas: High-quality chocolate truffles, a really nice hand cream, or a folded-up gift card to their favorite spot (reference that printable PDF!).
Step-by-Step Tutorial: How to Make the Pencil Jar
Grab your iced coffee, put on some Texas country music, and let’s get crafting.
Step 1: Prep and Tape First things first, wash and dry your glass jar thoroughly. Paint doesn’t stick to greasy fingerprints. Next, you need to tape off the middle section of the jar. The bottom base is going to be our yellow pencil body, the glass bowl will remain clear to show off the goods, and the lid is going to be our pink eraser. Use good painter’s tape and press the edges down firmly so your paint lines are crisp.
Step 2: Paint the Pencil Body (Yellow) Take your FolkArt School Bus Yellow and start painting the bottom base. Here is the secret to painting glass: patience. Do not glob it on. You want thin, even coats. Let the first coat dry completely before adding the second. Depending on your brush, you might need three coats for totally opaque, vibrant coverage.
Step 3: Paint the Eraser (Pink) While your yellow is drying, take the lid of the jar and your FolkArt Baby Pink paint. Same rules apply here—thin, even coats. Once it’s dry, it genuinely looks like a giant pencil eraser. It’s so satisfying.
Step 4: The Cricut Magic While everything is drying, fire up your Cricut Maker. Open Design Space and type out “No. 2” in a bold, chunky font. Measure the clear glass portion of your jar to make sure you size the design correctly—you want it front and center, but not so big that it wraps around the curves too much. Cut it out on your black permanent vinyl, weed it, and use transfer tape to carefully apply it to the front of the clear glass bowl.
Step 5: Tie it All Together Once your paint is 100% dry (don’t rush this, or you’ll smudge it), carefully peel off the painter’s tape. To hide the seam where the yellow paint meets the clear glass, take your adorable ABC teacher ribbon and tie a crisp, beautiful bow right around the neck of the base.
Step 6: Fill ‘er Up! Now for the fun part. Throw in some crinkle paper at the bottom to give your items a little lift, and start arranging your goodies. Nestle the Summer Fridays lip balm and the Touchland hand sanitizer right up front so they are the first things she sees. Add in whatever other trendy items or gift cards you grabbed. Put the pink “eraser” lid on top, and you are done!
More Teacher Appreciation Ideas
If you are feeling incredibly crafty and want to go all out this year, this pencil jar pairs perfectly with another one of my favorite projects. You absolutely have to check out my Teacher Appreciation Crayon Wreath blog post. It is colorful, it is totally extra, and it looks amazing hanging on a classroom door.
Let’s See Your Creations!
I hope this step-by-step tutorial helps you win Teacher Appreciation Week this year. It’s a little bit of effort for a whole lot of impact, and it’s a great way to show the educators in our lives some serious love.
If you decide to make this DIY #2 Pencil Gumball Jar (or use any of the trendy filler ideas!), please take a picture and tag me on Instagram! I love seeing your fun creations and how you put your own spin on my DIYs.
And make sure to follow along and subscribe to the blog for more festive content, upcoming event recaps, and all the eccentric decorating projects we have planned for the summer!
Happy crafting, y’all!